> ## Documentation Index
> Fetch the complete documentation index at: https://datagen.dev/llms.txt
> Use this file to discover all available pages before exploring further.
# 工具
> 透過連線保險庫與工具套件提供 Agent 工具:MCP 伺服器、自訂工具、DataGen MCP 閘道、工作區資料工具與 Code mode
Agent 可以呼叫其**工具套件**中的工具。工具套件是**連線保險庫**中的一份允許清單:連線保險庫保存憑證(MCP 伺服器與機密),工具套件則挑選 Agent 可使用該連線保險庫中的哪些工具。在 Agent 上選好連線保險庫與工具套件後,每次執行都會取得完全相同的工具,並以該連線保險庫的憑證驗證。
 | 工具來源 | 是什麼 | 從哪裡來 |
| - | - | - |
| **預設** | 不需外部憑證的內建工具 | 每個連線保險庫都有 |
| **MCP** | 遠端 MCP 伺服器提供的工具(Slack、Linear、Gmail、你自己的伺服器…) | 連線保險庫中的 MCP 憑證 |
| **自訂** | 你部署成工具的確定性 Python 工作流程 | [自訂工具](#自訂工具) |
| **DataGen MCP 閘道** | `searchTools`、`getToolDetails`、`executeToolCall` | Agent 上的「為此代理啟用 DataGen MCP」開關 |
| **工作區資料工具** | 以唯讀方式存取工作區檔案、先前的輸出與已連結的知識庫 | Agent 上的「為此代理啟用工作區資料工具」開關 |
***
## Agent 如何取得工具
在側邊欄開啟「連線保險庫」,進入一個連線保險庫,並在「憑證」分頁加入 MCP 伺服器與機密。請參閱 [新增 MCP 伺服器](#新增-mcp-伺服器)。
在連線保險庫的「工具包」分頁建立工具套件並選擇其中的工具,或開啟「允許此保險庫中的所有工具」。請參閱 [工具套件](#工具套件)。
在 Builder 的「設定」分頁(或 Agent「設定」分頁中的「保險庫與工具套件」),選擇「保險庫」與「工具套件」。工具套件清單只會列出所選連線保險庫中的套件。
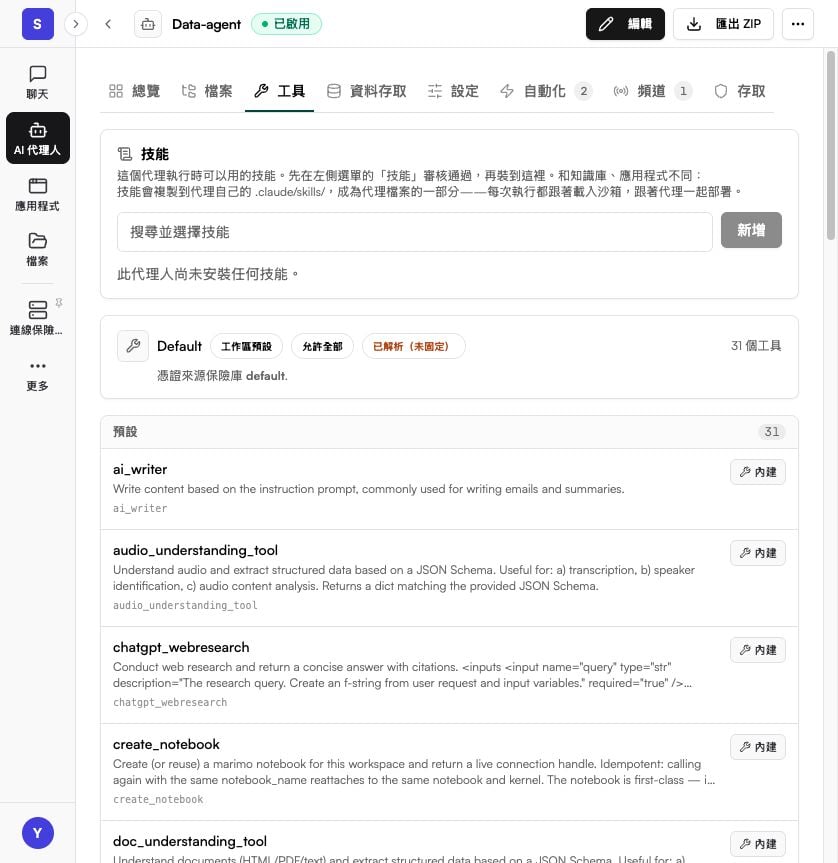
Agent 的「工具」分頁會顯示實際套用的工具套件、憑證來自哪個連線保險庫,以及依「預設」、「MCP」、「自訂」分組的所有工具。每個 MCP 工具都會標示它使用工作區共用或個人憑證驗證。
如果 Agent 沒有選擇連線保險庫或工具套件,會使用工作區預設的連線保險庫與該金庫的預設工具套件。變更會從 Agent 的下一輪開始生效。
***
## 新增 MCP 伺服器
MCP 伺服器讓 Agent 能存取 Gmail、Linear、Slack、HubSpot 等外部服務。你只要在連線保險庫中把伺服器加為憑證一次,所有使用該連線保險庫的 Agent 都能使用它。
### 從 MCP 登錄
開啟連線保險庫,進入「MCP 登錄」分頁,在伺服器上點選「連接」。OAuth 伺服器會開啟登入視窗;核准後,該列會顯示為已連接。
### 以 URL 新增任何 MCP 伺服器
在連線保險庫的「憑證」分頁點選「新增憑證」,選擇「MCP 伺服器」。
輸入名稱、伺服器 URL(例如 `https://mcp.example.com/mcp`)與「驗證方式」:「OAuth」、「Bearer 權杖」、「API 金鑰」或「無驗證」。
「與工作區共用」:由管理員提供一個值,所有人都可使用但看不到它。「個人」:每位成員透過該列的「連接」按鈕連接自己的帳號。OAuth 一律是個人憑證。
儲存時 DataGen 會列出伺服器的工具。使用「重新整理工具」可重新同步連線保險庫中所有 MCP 伺服器的工具目錄。
憑證類型、輪替與對外連線政策,請參閱 [連線保險庫](/zh/foundation/vault)。
### 常用的 MCP 伺服器
* **Notion** -- `https://mcp.notion.com/mcp`
* **Linear** -- `https://mcp.linear.app/sse`
* **Neon** -- `https://mcp.neon.tech`
* **開源伺服器** -- [github.com/modelcontextprotocol/servers](https://github.com/modelcontextprotocol/servers)
* **你自己的系統** -- 用 MCP SDK 建立伺服器,再以 URL 新增
### 從 Claude Code 新增
安裝 DataGen 外掛後執行:
```
/datagen:add-mcps
```
它會先檢查 DataGen 內建的伺服器範本,連接伺服器(必要時執行 OAuth 流程),並列出新增的工具。你也可以直接請 Claude 處理,例如 `"Add Linear MCP to DataGen: https://mcp.linear.app/sse"`,它會替你呼叫 `addRemoteMcpServer`。
***
## 工具套件
工具套件是一份以單一連線保險庫憑證驗證的工具允許清單。
* 在連線保險庫的「工具包」分頁點選「新增工具包」並命名,例如 `read-only`。
* 從連線保險庫的工具中挑選成員,依預設、MCP 與自訂分組。
* 或開啟「允許此保險庫中的所有工具」:連線保險庫中的所有預設工具、MCP 伺服器工具與自訂工具都會納入,之後新增的工具也會自動納入。
每個工具套件也有一個 **MCP URL**,讓 DataGen 以外的 MCP 用戶端使用同一份允許清單。輪替 MCP URL 會立即撤銷目前的 URL。
為不同類型的 Agent 各建立範圍較窄的工具套件——例如一個只含報表工具、另一個可寫入 CRM——而不是讓每個 Agent 都使用「允許此保險庫中的所有工具」。
***
## DataGen MCP 閘道
開啟「為此代理啟用 DataGen MCP」(Builder 的「設定」分頁,或 Agent 的「設定」分頁),即可為 Agent 的執行掛上 DataGen MCP 閘道。Agent 就能透過 `searchTools`、`getToolDetails` 與 `executeToolCall` 隨時探索並呼叫工具。此功能預設關閉,從下一輪開始生效,且不影響 Agent 載入的其他 MCP 伺服器。
## 工作區資料工具
「為此代理啟用工作區資料工具」(Builder 的「設定」分頁,或 Agent 的「資料存取」分頁)讓 Agent 在執行開始時複製進沙盒的內容之外,還能隨時列出、讀取並取得工作區的原始檔案、它自己先前的輸出,以及已連結的知識庫。這些工具是唯讀的:Agent 永遠無法透過它們寫入或刪除,其他 Agent 的檔案與其他成員的個人檔案也保持私密。預設為開啟。
如果 Agent 設定了「資料範圍」,這些工具只會回傳範圍內的原始資料;關閉工具後,有資料範圍的 Agent 將無法讀取任何原始資料。請參閱 [建立 Agent](/zh/agents/build)。
## 呼叫其他 Agent
在「資料存取」分頁的「可呼叫的代理」中,列出此 Agent 可以透過 `datagen-assets invoke` 啟動一輪對話的其他 Agent。每次呼叫都以 Agent 正在服務的使用者身分執行,該使用者必須有權執行目標 Agent,且目標 Agent 必須已啟用。被呼叫的 Agent 不能再呼叫其他 Agent。
***
## 自訂工具
自訂工具是確定性的 Python 工作流程,協助 Agent 快速、可靠地完成操作。與其讓 Agent 每次自己推敲多步驟的邏輯,不如把它包裝成工具:相同的輸入,每次都得到相同的輸出。
部署後的自訂工具會出現在「工具」頁面的「自訂工具」中,可以加入工具套件,並可從 Agent、Claude 對話與 REST API 呼叫。
**使用 Claude Code?** 執行 `/datagen:create-custom-tool`,它會引導你設計結構描述、實作並測試程式碼,再完成部署。
### 撰寫程式碼
使用 DataGen SDK,把 MCP 工具當作 Python 函式呼叫:
```python theme={null}
from datagen_sdk import DatagenClient
client = DatagenClient()
issues = client.execute_tool("mcp_Linear_list_issues", {
"filter": {"state": {"name": {"eq": "In Progress"}}}
})
active_count = len(issues)
result = f"Found {active_count} active issues"
```
**輸入結構描述。** 用 JSON Schema 定義工具接受的參數:
```json theme={null}
{
"type": "object",
"properties": {
"campaign_id": {"type": "string", "description": "The campaign ID to analyze"},
"days": {"type": "integer", "description": "Number of days to look back", "default": 30}
},
"required": ["campaign_id"]
}
```
**輸出變數。** 列出程式碼所指定的變數,它們會成為工具的回傳值:
```python theme={null}
result = {"total_leads": 150, "conversion_rate": 0.12}
summary = "Campaign performed above average"
# 輸出變數:["result", "summary"]
```
**相依項目。**
| 類型 | 說明 | 範例 |
| - | - | - |
| **MCP 伺服器** | 程式碼會呼叫哪些 MCP 伺服器 | `["Linear", "Gmail"]` |
| **機密** | 程式碼需要的環境變數 | `["OPENAI_API_KEY"]` |
| **Import** | 要匯入的 Python 套件 | `["pandas", "httpx"]` |
### 測試與部署
1. **測試**:先在沙盒中執行程式碼。請 Claude 執行它,Claude 會呼叫 `executeCode`。
2. **部署**:請 Claude `"Deploy this as a custom tool called 'analyze_campaign'"`,Claude 會帶著你的程式碼、結構描述與相依項目呼叫 `createCustomTool`。
3. **執行**已部署的工具:`"Run my analyze_campaign tool with campaign_id='abc123'"` 會呼叫 `submitCustomToolRun`;`checkRunStatus` 則回傳狀態與輸出。
之後要修改工具,請 Claude 更新它(`updateCustomTool`),或用 `searchCustomTools` 找到你的工具。
在終端機中:
```bash theme={null}
datagen tools list
datagen tools show
datagen tools run --input '{"campaign_id": "abc123"}'
```
所有選項請參閱 [CLI](/zh/developers/cli) 與 [MCP 工具](/zh/developers/mcp-tools)。
```python theme={null}
from datagen_sdk import DatagenClient
client = DatagenClient()
enriched = []
for domain in input_domains: # 來自輸入結構描述
research = client.execute_tool("mcp_Perplexity_search", {
"query": f"What does {domain} do? Who are the founders?"
})
enriched.append({"domain": domain, "description": research.get("answer")})
result = enriched
total_enriched = len(enriched)
```
輸入結構描述:`input_domains`(字串陣列,必填)。輸出變數:`["result", "total_enriched"]`。MCP 伺服器:`["Perplexity"]`。
* **讓工具保持專注。** 一個工具只做一件事。
* **使用具描述性的名稱。** 用 `enrich_company_data`,而不是 `tool1`;好的描述能幫助 Agent 選對工具。
* **處理錯誤。** 在工具呼叫外捕捉 `DatagenToolError`,並回傳清楚的訊息。
* **部署前先測試。** 先用 `executeCode` 執行;已部署的工具比較難除錯。
***
## Code mode
Code mode 是指撰寫透過 DataGen SDK 呼叫 MCP 工具的 Python 或 TypeScript 腳本,而不是在對話中一次呼叫一個工具。適用於批次處理、複雜邏輯與正式環境的工作。
**使用 Claude Code?** 執行 `/datagen:code-mode`,取得包含工具探索與大型輸出處理的腳本撰寫引導。
**經驗法則:** 少於 5 次工具呼叫且結果不大,直接呼叫工具即可。呼叫次數更多、資料量大或邏輯複雜,就寫腳本。
```bash theme={null}
pip install datagen-python-sdk
export DATAGEN_API_KEY="your_api_key_here"
```
```python theme={null}
from datagen_sdk import DatagenClient, DatagenToolError
client = DatagenClient(retries=3, backoff_seconds=1.0)
sent, failed = [], []
for contact in contacts:
try:
client.execute_tool("mcp_Gmail_gmail_send_email", {
"to": contact["email"],
"subject": "Welcome!",
"body": f"Hi {contact['name']}, thanks for signing up!",
})
sent.append(contact["email"])
except DatagenToolError as e:
failed.append({"email": contact["email"], "error": str(e)})
print(f"Sent: {len(sent)}, Failed: {len(failed)}")
```
```bash theme={null}
npm install @datagen-dev/typescript-sdk
export DATAGEN_API_KEY="your_api_key_here"
```
```typescript theme={null}
import { DatagenClient } from '@datagen-dev/typescript-sdk';
const client = new DatagenClient();
const result = await client.executeTool(
"mcp_Linear_list_issues",
{ filter: { state: { name: { eq: "In Progress" } } } }
);
console.log(`Found ${result.length} active issues`);
```
| 錯誤 | 意義 |
| - | - |
| `DatagenAuthError` | 驗證失敗(401/403):請檢查 API 金鑰或 MCP 連線 |
| `DatagenToolError` | 工具執行失敗:請檢查參數 |
| `DatagenHttpError` | 網路或 HTTP 層級錯誤 |
所有方法(包括把腳本部署為自訂工具)請參閱 [Python SDK](/zh/developers/sdk-python) 與 [TypeScript SDK](/zh/developers/sdk-typescript)。
***
## 疑難排解
1. 確認「工具」分頁顯示套用的是哪個工具套件;Agent 可能使用的是工作區預設值。
2. 在連線保險庫的「工具包」分頁開啟該工具套件並加入工具,或開啟「允許此保險庫中的所有工具」。
3. 在連線保險庫的「憑證」分頁點選「重新整理工具」,重新同步 MCP 伺服器的工具清單。
1. 允許 DataGen 開啟彈出視窗;OAuth 流程會在彈出視窗中進行。
2. 改用私密視窗,或清除該服務供應商的 Cookie。
3. 確認你的組織是否封鎖了該服務的 OAuth。
4. 在憑證列上點選「連接」重新執行流程。
1. 確認在 OAuth 時已授予供應商要求的所有權限範圍。
2. 有些服務的特定權限範圍需要管理員核准。
3. 若是個人憑證,請確認觸發執行的成員已連接自己的帳號。
## 下一步
立即執行、排程,以及用自動化設定 Webhook
Slack、Teams、Discord、電子郵件、網頁聊天與公開聊天連結
This documentation is built and hosted on [Mintlify](https://mintlify.com), a developer documentation platform.
| 工具來源 | 是什麼 | 從哪裡來 |
| - | - | - |
| **預設** | 不需外部憑證的內建工具 | 每個連線保險庫都有 |
| **MCP** | 遠端 MCP 伺服器提供的工具(Slack、Linear、Gmail、你自己的伺服器…) | 連線保險庫中的 MCP 憑證 |
| **自訂** | 你部署成工具的確定性 Python 工作流程 | [自訂工具](#自訂工具) |
| **DataGen MCP 閘道** | `searchTools`、`getToolDetails`、`executeToolCall` | Agent 上的「為此代理啟用 DataGen MCP」開關 |
| **工作區資料工具** | 以唯讀方式存取工作區檔案、先前的輸出與已連結的知識庫 | Agent 上的「為此代理啟用工作區資料工具」開關 |
***
## Agent 如何取得工具
在側邊欄開啟「連線保險庫」,進入一個連線保險庫,並在「憑證」分頁加入 MCP 伺服器與機密。請參閱 [新增 MCP 伺服器](#新增-mcp-伺服器)。
在連線保險庫的「工具包」分頁建立工具套件並選擇其中的工具,或開啟「允許此保險庫中的所有工具」。請參閱 [工具套件](#工具套件)。
在 Builder 的「設定」分頁(或 Agent「設定」分頁中的「保險庫與工具套件」),選擇「保險庫」與「工具套件」。工具套件清單只會列出所選連線保險庫中的套件。
Agent 的「工具」分頁會顯示實際套用的工具套件、憑證來自哪個連線保險庫,以及依「預設」、「MCP」、「自訂」分組的所有工具。每個 MCP 工具都會標示它使用工作區共用或個人憑證驗證。
如果 Agent 沒有選擇連線保險庫或工具套件,會使用工作區預設的連線保險庫與該金庫的預設工具套件。變更會從 Agent 的下一輪開始生效。
***
## 新增 MCP 伺服器
MCP 伺服器讓 Agent 能存取 Gmail、Linear、Slack、HubSpot 等外部服務。你只要在連線保險庫中把伺服器加為憑證一次,所有使用該連線保險庫的 Agent 都能使用它。
### 從 MCP 登錄
開啟連線保險庫,進入「MCP 登錄」分頁,在伺服器上點選「連接」。OAuth 伺服器會開啟登入視窗;核准後,該列會顯示為已連接。
### 以 URL 新增任何 MCP 伺服器
在連線保險庫的「憑證」分頁點選「新增憑證」,選擇「MCP 伺服器」。
輸入名稱、伺服器 URL(例如 `https://mcp.example.com/mcp`)與「驗證方式」:「OAuth」、「Bearer 權杖」、「API 金鑰」或「無驗證」。
「與工作區共用」:由管理員提供一個值,所有人都可使用但看不到它。「個人」:每位成員透過該列的「連接」按鈕連接自己的帳號。OAuth 一律是個人憑證。
儲存時 DataGen 會列出伺服器的工具。使用「重新整理工具」可重新同步連線保險庫中所有 MCP 伺服器的工具目錄。
憑證類型、輪替與對外連線政策,請參閱 [連線保險庫](/zh/foundation/vault)。
### 常用的 MCP 伺服器
* **Notion** -- `https://mcp.notion.com/mcp`
* **Linear** -- `https://mcp.linear.app/sse`
* **Neon** -- `https://mcp.neon.tech`
* **開源伺服器** -- [github.com/modelcontextprotocol/servers](https://github.com/modelcontextprotocol/servers)
* **你自己的系統** -- 用 MCP SDK 建立伺服器,再以 URL 新增
### 從 Claude Code 新增
安裝 DataGen 外掛後執行:
```
/datagen:add-mcps
```
它會先檢查 DataGen 內建的伺服器範本,連接伺服器(必要時執行 OAuth 流程),並列出新增的工具。你也可以直接請 Claude 處理,例如 `"Add Linear MCP to DataGen: https://mcp.linear.app/sse"`,它會替你呼叫 `addRemoteMcpServer`。
***
## 工具套件
工具套件是一份以單一連線保險庫憑證驗證的工具允許清單。
* 在連線保險庫的「工具包」分頁點選「新增工具包」並命名,例如 `read-only`。
* 從連線保險庫的工具中挑選成員,依預設、MCP 與自訂分組。
* 或開啟「允許此保險庫中的所有工具」:連線保險庫中的所有預設工具、MCP 伺服器工具與自訂工具都會納入,之後新增的工具也會自動納入。
每個工具套件也有一個 **MCP URL**,讓 DataGen 以外的 MCP 用戶端使用同一份允許清單。輪替 MCP URL 會立即撤銷目前的 URL。
為不同類型的 Agent 各建立範圍較窄的工具套件——例如一個只含報表工具、另一個可寫入 CRM——而不是讓每個 Agent 都使用「允許此保險庫中的所有工具」。
***
## DataGen MCP 閘道
開啟「為此代理啟用 DataGen MCP」(Builder 的「設定」分頁,或 Agent 的「設定」分頁),即可為 Agent 的執行掛上 DataGen MCP 閘道。Agent 就能透過 `searchTools`、`getToolDetails` 與 `executeToolCall` 隨時探索並呼叫工具。此功能預設關閉,從下一輪開始生效,且不影響 Agent 載入的其他 MCP 伺服器。
## 工作區資料工具
「為此代理啟用工作區資料工具」(Builder 的「設定」分頁,或 Agent 的「資料存取」分頁)讓 Agent 在執行開始時複製進沙盒的內容之外,還能隨時列出、讀取並取得工作區的原始檔案、它自己先前的輸出,以及已連結的知識庫。這些工具是唯讀的:Agent 永遠無法透過它們寫入或刪除,其他 Agent 的檔案與其他成員的個人檔案也保持私密。預設為開啟。
如果 Agent 設定了「資料範圍」,這些工具只會回傳範圍內的原始資料;關閉工具後,有資料範圍的 Agent 將無法讀取任何原始資料。請參閱 [建立 Agent](/zh/agents/build)。
## 呼叫其他 Agent
在「資料存取」分頁的「可呼叫的代理」中,列出此 Agent 可以透過 `datagen-assets invoke` 啟動一輪對話的其他 Agent。每次呼叫都以 Agent 正在服務的使用者身分執行,該使用者必須有權執行目標 Agent,且目標 Agent 必須已啟用。被呼叫的 Agent 不能再呼叫其他 Agent。
***
## 自訂工具
自訂工具是確定性的 Python 工作流程,協助 Agent 快速、可靠地完成操作。與其讓 Agent 每次自己推敲多步驟的邏輯,不如把它包裝成工具:相同的輸入,每次都得到相同的輸出。
部署後的自訂工具會出現在「工具」頁面的「自訂工具」中,可以加入工具套件,並可從 Agent、Claude 對話與 REST API 呼叫。
**使用 Claude Code?** 執行 `/datagen:create-custom-tool`,它會引導你設計結構描述、實作並測試程式碼,再完成部署。
### 撰寫程式碼
使用 DataGen SDK,把 MCP 工具當作 Python 函式呼叫:
```python theme={null}
from datagen_sdk import DatagenClient
client = DatagenClient()
issues = client.execute_tool("mcp_Linear_list_issues", {
"filter": {"state": {"name": {"eq": "In Progress"}}}
})
active_count = len(issues)
result = f"Found {active_count} active issues"
```
**輸入結構描述。** 用 JSON Schema 定義工具接受的參數:
```json theme={null}
{
"type": "object",
"properties": {
"campaign_id": {"type": "string", "description": "The campaign ID to analyze"},
"days": {"type": "integer", "description": "Number of days to look back", "default": 30}
},
"required": ["campaign_id"]
}
```
**輸出變數。** 列出程式碼所指定的變數,它們會成為工具的回傳值:
```python theme={null}
result = {"total_leads": 150, "conversion_rate": 0.12}
summary = "Campaign performed above average"
# 輸出變數:["result", "summary"]
```
**相依項目。**
| 類型 | 說明 | 範例 |
| - | - | - |
| **MCP 伺服器** | 程式碼會呼叫哪些 MCP 伺服器 | `["Linear", "Gmail"]` |
| **機密** | 程式碼需要的環境變數 | `["OPENAI_API_KEY"]` |
| **Import** | 要匯入的 Python 套件 | `["pandas", "httpx"]` |
### 測試與部署
1. **測試**:先在沙盒中執行程式碼。請 Claude 執行它,Claude 會呼叫 `executeCode`。
2. **部署**:請 Claude `"Deploy this as a custom tool called 'analyze_campaign'"`,Claude 會帶著你的程式碼、結構描述與相依項目呼叫 `createCustomTool`。
3. **執行**已部署的工具:`"Run my analyze_campaign tool with campaign_id='abc123'"` 會呼叫 `submitCustomToolRun`;`checkRunStatus` 則回傳狀態與輸出。
之後要修改工具,請 Claude 更新它(`updateCustomTool`),或用 `searchCustomTools` 找到你的工具。
在終端機中:
```bash theme={null}
datagen tools list
datagen tools show
datagen tools run --input '{"campaign_id": "abc123"}'
```
所有選項請參閱 [CLI](/zh/developers/cli) 與 [MCP 工具](/zh/developers/mcp-tools)。
```python theme={null}
from datagen_sdk import DatagenClient
client = DatagenClient()
enriched = []
for domain in input_domains: # 來自輸入結構描述
research = client.execute_tool("mcp_Perplexity_search", {
"query": f"What does {domain} do? Who are the founders?"
})
enriched.append({"domain": domain, "description": research.get("answer")})
result = enriched
total_enriched = len(enriched)
```
輸入結構描述:`input_domains`(字串陣列,必填)。輸出變數:`["result", "total_enriched"]`。MCP 伺服器:`["Perplexity"]`。
* **讓工具保持專注。** 一個工具只做一件事。
* **使用具描述性的名稱。** 用 `enrich_company_data`,而不是 `tool1`;好的描述能幫助 Agent 選對工具。
* **處理錯誤。** 在工具呼叫外捕捉 `DatagenToolError`,並回傳清楚的訊息。
* **部署前先測試。** 先用 `executeCode` 執行;已部署的工具比較難除錯。
***
## Code mode
Code mode 是指撰寫透過 DataGen SDK 呼叫 MCP 工具的 Python 或 TypeScript 腳本,而不是在對話中一次呼叫一個工具。適用於批次處理、複雜邏輯與正式環境的工作。
**使用 Claude Code?** 執行 `/datagen:code-mode`,取得包含工具探索與大型輸出處理的腳本撰寫引導。
**經驗法則:** 少於 5 次工具呼叫且結果不大,直接呼叫工具即可。呼叫次數更多、資料量大或邏輯複雜,就寫腳本。
```bash theme={null}
pip install datagen-python-sdk
export DATAGEN_API_KEY="your_api_key_here"
```
```python theme={null}
from datagen_sdk import DatagenClient, DatagenToolError
client = DatagenClient(retries=3, backoff_seconds=1.0)
sent, failed = [], []
for contact in contacts:
try:
client.execute_tool("mcp_Gmail_gmail_send_email", {
"to": contact["email"],
"subject": "Welcome!",
"body": f"Hi {contact['name']}, thanks for signing up!",
})
sent.append(contact["email"])
except DatagenToolError as e:
failed.append({"email": contact["email"], "error": str(e)})
print(f"Sent: {len(sent)}, Failed: {len(failed)}")
```
```bash theme={null}
npm install @datagen-dev/typescript-sdk
export DATAGEN_API_KEY="your_api_key_here"
```
```typescript theme={null}
import { DatagenClient } from '@datagen-dev/typescript-sdk';
const client = new DatagenClient();
const result = await client.executeTool(
"mcp_Linear_list_issues",
{ filter: { state: { name: { eq: "In Progress" } } } }
);
console.log(`Found ${result.length} active issues`);
```
| 錯誤 | 意義 |
| - | - |
| `DatagenAuthError` | 驗證失敗(401/403):請檢查 API 金鑰或 MCP 連線 |
| `DatagenToolError` | 工具執行失敗:請檢查參數 |
| `DatagenHttpError` | 網路或 HTTP 層級錯誤 |
所有方法(包括把腳本部署為自訂工具)請參閱 [Python SDK](/zh/developers/sdk-python) 與 [TypeScript SDK](/zh/developers/sdk-typescript)。
***
## 疑難排解
1. 確認「工具」分頁顯示套用的是哪個工具套件;Agent 可能使用的是工作區預設值。
2. 在連線保險庫的「工具包」分頁開啟該工具套件並加入工具,或開啟「允許此保險庫中的所有工具」。
3. 在連線保險庫的「憑證」分頁點選「重新整理工具」,重新同步 MCP 伺服器的工具清單。
1. 允許 DataGen 開啟彈出視窗;OAuth 流程會在彈出視窗中進行。
2. 改用私密視窗,或清除該服務供應商的 Cookie。
3. 確認你的組織是否封鎖了該服務的 OAuth。
4. 在憑證列上點選「連接」重新執行流程。
1. 確認在 OAuth 時已授予供應商要求的所有權限範圍。
2. 有些服務的特定權限範圍需要管理員核准。
3. 若是個人憑證,請確認觸發執行的成員已連接自己的帳號。
## 下一步
立即執行、排程,以及用自動化設定 Webhook
Slack、Teams、Discord、電子郵件、網頁聊天與公開聊天連結
This documentation is built and hosted on [Mintlify](https://mintlify.com), a developer documentation platform.